• Skip to primary navigation
  • Skip to main content
  • Skip to primary sidebar
  • Skip to footer
projectsgeek

ProjectsGeek

Download Mini projects with Source Code, Java projects with Source Codes

  • Home
  • Java Projects
  • C++ Projects
  • VB Projects
  • PHP projects
  • .Net Projects
  • NodeJs Projects
  • Android Projects
    • Project Ideas
      • Final Year Project Ideas
      • JSP Projects
  • Assignment Codes
    • Fundamentals of Programming Language
    • Software Design Laboratory
    • Data Structure and Files Lab
    • Computer Graphics Lab
    • Object Oriented Programming Lab
    • Assembly Codes
  • School Projects
  • Forum

Software Testing

Black Box Testing , Automated Testing Tool

November 6, 2011 by ProjectsGeek Leave a Comment

Automated Testing
Perform Black Box testing using automated testing tool on an application
Context sensitive mode
A] Recording test in analog and context sensitive mode
B] Choosing a Record Mode
By recording, you can quickly create automated test scripts. You work with your application as usual, clicking objects with the mouse and entering keyboard input. WinRunner records your operations and generates statements in TSL, Mercury Interactive’s Test Script Language. These statements appear as a script in a WinRunner test window. Before you begin recording a test, you should plan the main stages of the test and select the appropriate record mode. Two record modes are available: Context Sensitive and Analog.
Context Sensitive
Context Sensitive mode records your operations in terms of the GUI objects in your application. WinRunner identifies each object you click (such as a window, menu, list, or button), and the type of operation you perform (such as press, enable, move, or select).For example, if you record a mouse click on the OK button in the Flight Reservation Login window, WinRunner records the following TSL statement in your test script: button_press (“OK”);
When you run the script, WinRunner reads the command, looks for the OK button, and presses it.
Analog
In Analog mode, WinRunner records the exact coordinates traveled by the mouse, as well as mouse clicks and keyboard input. For example, if you click the OK button in the Login window, WinRunner records statements that look like this:
When this statement is recorded… ………. it really means:
move_locator_track (1); mouse track
mtype (““)
; left mouse button press
mtype (“+”); left mouse button release
When you run the test, WinRunner retraces the recorded movements using absolute screen coordinates. If your application is located in a different position on the desktop, or the user interface has changed, WinRunner is not able to execute the test correctly. In this exercise you will create a script that tests the process of opening an order in the Flight Reservation application. You will create the script by recording in
Context Sensitive mode.
1 Start WinRunner.
If WinRunner is not already open, choose Programs > WinRunner > WinRunner on the Start menu.
2 Open a new test.
If the Welcome window is open, click the New Test button. Otherwise, choose File > New. A new test window opens in WinRunner.
3. Start the Flight Reservation application and log in.
Choose Programs > WinRunner > Sample Applications > Flight 1A on the Start menu. In the Login window, type your name and the password mercury, and click OK. The name you type must be at least four characters long.Position the Flight Reservation application and WinRunner so that they are both clearly visible on your desktop
Black Box Testing , Automated Testing Tool 1
4. Start recording in Context Sensitive mode.
In WinRunner, choose Create > Record—Context Sensitive or click the Record button on the toolbar. From this point on, WinRunner records all mouse clicks and keyboard input. Note that the text, “Rec” appears in blue above the recording button. This indicates that you are recording in Context Sensitive mode. The status bar also informs you of your current recording mode.
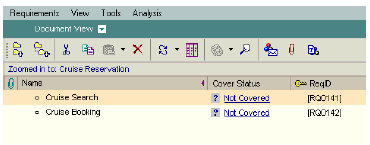
5. Open order #3.
In the Flight Reservation application, choose File > Open Order. In the Open Order dialog box, select the Order No. check box. Type 3 in the adjacent box, and click OK.Watch how WinRunner generates a test script in the test window as you work.
6. Stop recording.
In WinRunner, choose Create > Stop Recording or click the Stop button on the  toolbar.
7. Save the test.

Choose File > Save or click the Save button on the toolbar. Save the test as lesson3 in a convenient location on your hard drive. Click Save to close the Save Test dialog 

box.Note that WinRunner saves the lesson3 test in the file system as a folder, and not as an individual file. This folder contains the test script and the results that are generated when you run the test.
Output: WinRunner Test Results window is open and displays the test results.
Conclusion:
Recording in ContextSensitive mode is cleared and test results are also seen.

Other Projects to Try:

  1. White Box Testing , Cyclomatic Complexity, Data Flow Testing, Control Flow Testing
  2. Basics of Hacking and Penetration Testing
  3. TestPage
  4. Search Result
  5. Automated Sports Club System Project

Filed Under: Software Testing

White Box Testing , Cyclomatic Complexity, Data Flow Testing, Control Flow Testing

November 6, 2011 by ProjectsGeek Leave a Comment

Perform white box testing – Cyclomatic complexity, Data flow testing, Control flow testing.
 
What is White-box Testing?
•         Looking at the internal structure of a program and deriving test cases based on the logic or control flow.
•         Test cases can be designed to reach every branch in the code and to exercise each condition
•         Typically done during unit testing
•         Also known as:
–        Structural Testing
–        Glass-Box Testing
•         Looking at the program from an external point of view and deriving test cases based on the specification.
•         The only criteria upon which the program is judged is if it produces the correct output for a given input.
Control Flow Graph
Example Code Fragment
White Box Testing , Cyclomatic Complexity, Data Flow Testing, Control Flow Testing 2
White Box Testing , Cyclomatic Complexity, Data Flow Testing, Control Flow Testing 3
Cyclomatic Complexity
Directly measures the number of linearly independent paths through a program’s source code, taking into account the various decision points
     Calculating Cyclomatic complexity
     1.   E-N+2
            Where
E – Number of Eges
            N – Number of Nodes
     2. # regions + 1

Other Projects to Try:

  1. Black Box Testing , Automated Testing Tool
  2. Climatic Data analysis using Hadoop Project
  3. Manual Testing
  4. Big Data Hadoop Projects Ideas
  5. Website Testing Tools

Filed Under: Software Testing

Manual Testing

November 6, 2011 by ProjectsGeek Leave a Comment

Manual Testing
What is Software Testing?
Software testing is a process used to identify the correctness, completeness and quality of developed computer software.
A set of activities conducted with the intent of finding errors in software.
Software testing is an investigation conducted to provide stakeholders with information about the quality of the product or service under test
Manual testing
Manual testing is the oldest and most rigorous type of software testing. Manual testing requires a tester to perform manual test operations on the test software without the help of Test automation. Manual testing is a laborious activity that requires the tester to possess a certain set of qualities; to be patient, observant, speculative, creative, innovative, open-minded, resourceful, unopinionated, and skillful.
Steps for Manual Testing
A manual tester would typically perform the following steps for manual testing:
1. Understand the functionality of program
2. Prepare a test environment
3. Execute test case(s) manually
4. Verify the actual result
5. Record the result as Pass or Fail
6. Make a summary report of the Pass and Fail test cases
7. Publish the report
8. Record any new defects uncovered during the test case execution
Test
• An activity in which a system or component is executed under specified conditions, the result are observed or recorded, and an evaluation is made of some aspect of the system or component.
Test Case
• A set of test inputs, execution conditions, and expected results developed for a particular objective
• The smallest entity that is always executed as unit, from beginning to end
• A test case is a document that describes an input, action, or event and an expected response, to determine if a feature of an application is working correctly
A test case should contain particulars such as test case identifier, test case name, objective, test conditions/setup, input data requirements, steps, and expected results
• Test case may also include prerequisites
Test Case Components
• The structure of test cases is one of the things that stays remarkably the same regardless of the technology being tested. The conditions to be tested may differ greatly from one technology to the next, but you still need to know three basic things about what you plan to test:
• ID #: This is a unique identifier for the test case. The identifier does not imply a sequential order of test execution in most cases. The test case ID can also be intelligent. For example, the test case ID of ORD001 could indicate a test case for the ordering process on the first web page.
• Condition: This is an event that should produce an observable result. For example, in an e-commerce application, if the user selects an overnight shipping option, the correct charge should be added to the total of the transaction. A test designer would want to test all shipping options, with each option giving a different amount added to the transaction total.
• Procedure: This is the process a tester needs to perform to invoke the condition and observe the results. A test case procedure should be limited to the steps needed to perform a single test case.
• Expected Result: This is the observable result from invoking a test condition. If you can’t observe a result, you can’t determine if a test passes or fails. In the previous example of an e-commerce shipping option, the expected results would be specifically defined according to the type of shipping the user selects.
• Pass/Fail: This is where the tester indicates the outcome of the test case. For the purpose of space, I typically use the same column to indicate both “pass” (P) and “fail” (F). In some situations, such as the regulated environment, simply indicating pass or fail is not enough information about the outcome of a test case to provide adequate documentation. For this reason, some people choose to also add a column for “Observed Results.”
• Defect Number Cross-reference: If you identify a defect in the execution of a test case, this component of the test case gives you a way to link the test case to a specific defect report.
a) Write black box test cases for an application using Test Director tool.
Specifying Testing Requirements
You begin the testing process by specifying testing requirements in TestDirector’s Requirements module. Requirements describe in detail what needs to be tested in your application and provide the test team with a foundation on which the entire testing process is based.
You define the requirements in TestDirector by creating a requirements tree. This is a graphical representation of your requirements specification, displaying your requirements hierarchically. You can group and sort requirements in the tree, monitor task allocation and progress of requirements, and generate detailed reports and graphs.
Defining Requirements
In the following exercise, you will define requirements for testing the functionality of reserving cruises in Mercury Tours.
To define a requirement:
1 Open the TestDirector_Demo project.
If the TestDirector_Demo project is not already open, log in to the project. For more information, see “Starting TestDirector,” on page 5.
2 Display the Requirements module.
Click the Requirements tab. The Requirements module displays the requirements tree.
3 Display the requirement tree in Document View.
Select the Document View of the requirement tree.
Manual Testing 4
4 Create a new requirement.
Click the New Requirement button on the Requirements module toolbar. Alternatively, choose Requirements > New Requirement. The New Requirement dialog box opens.
Manual Testing 5 
In the Name box, type Cruise Reservation.
In the Product box, select Mercury Tours (HTML Edition).
In the Priority box, select 4-Very High.
In the Type box, select Functional.
Click OK. TestDirector adds the Cruise Reservation requirement to the requirements tree.
5 Add a sub-requirement.
Click the New Child Requirement button to add the next requirement underneath the Cruise Reservation, at a lower hierarchical level. The New Requirement dialog box opens.
In the Name box, type Cruise Search.
In the Product box, select Mercury Tours (HTML Edition).
In the Priority box, select 4-Very High.
In the Type box, select Functional.
Click OK. TestDirector adds the Cruise Search requirement, under the Cruise Reservation requirement.
6 Add an additional sub-requirement.
In the requirements tree, select the Cruise Reservation requirement.
Repeat step 5. This time in the Name box, type Cruise Booking.
TestDirector adds the Cruise Booking requirement, under the Cruise Reservation requirement.
Manual Testing 6
 
Viewing Requirements
You can change the way TestDirector displays requirements in the requirements tree. In the following exercise, you will learn how to zoom in and out of the tree, display numeration, refresh the tree, and expand and collapse the branches of the tree.
To view requirements:
1 Display the Requirements module.
Click the Requirements tab. The Requirements module displays the requirements tree.
Make sure the requirements tree is displayed in Document view.
2 Zoom in and out of the requirement.
To zoom in, select Cruise Reservation in the requirements tree.
Click the Zoom In button on the toolbar. Alternatively, right-click the requirement and choose Zoom In. The requirements tree only displays the Cruise Reservation requirement, including its two sub-requirements.
Manual Testing 7
 
To reverse a zoom in action, click the Zoom In arrow, and choose Zoom Out To Root. The entire requirements tree is displayed.
3 Display numeration in the requirements tree.
To assign hierarchical numbers to each requirement in the tree, choose View > Numeration. As you make changes to the tree, TestDirector automatically renumbers the requirements. Note that the numbers are not related to the unique Req ID assigned to each requirement.
Manual Testing 8
 
4 Refresh the data in the Requirements module.
To refresh a requirement, select the requirement and click the Refresh Selected button. All children of the requirement are also refreshed.
To refresh all requirements, click the Refresh Selected arrow and choose Refresh All.
5 Expand and collapse the requirements.
To expand all the levels in a requirement, right-click a requirement and choose Expand.
To collapse all the levels in a requirement, right-click a requirement and choose Collapse.
19
Modifying Requirements
You can modify the requirements in the requirements tree. In the following exercise, you will learn how to copy, rename, move, or delete requirements.
To modify requirements:
1 Display the Requirements module.
Click the Requirements tab. The Requirements module displays the requirements tree.
2 Copy a requirement.
In the requirements tree, select the Cruise Reservation requirement and click the Copy button.
Click the Paste arrow and choose Paste. 
A message box opens. Click OK. The requirement is pasted underneath the selected requirement, at the same hierarchical level. _Copy_ is added to the end of the requirement’s name.
3 Rename the Cruise Reservation_Copy_ requirement.
Right-click the Cruise Reservation_Copy_ requirement and choose Rename.
Edit the requirement name to Hotel Reservation.
Press Enter.
4 Move the Hotel Reservation requirement to a different location in the requirements tree.
Select the Hotel Reservation requirement.
Click the Cut button.
Select the Reservations Management requirement.
To paste the Hotel Reservation requirement underneath the selected requirement, click the Paste arrow and choose Paste as Child.

Click Yes to confirm.

Manual Testing 9


5 Delete the Hotel Reservation requirement.
Select the Hotel Reservation requirement.
Click the Delete button, or choose Requirements > Delete.
Click Yes to confirm.
Converting Requirements
Once you have created the requirements tree, you use the requirements as a basis for defining your test plan tree in the Test Plan module. You can use the Convert to Tests wizard to assist you when designing your test plan tree. The wizard enables you to convert selected requirements or all requirements in the requirements tree to tests or subjects in the test plan tree.
In the following exercise you will convert the Cruise Reservation requirement to a subject in the test plan tree. Its sub-requirements will be converted to tests.
To convert a requirement:
1 Display the Requirements module.
Click the Requirements tab. The Requirements module displays the requirements tree.
2 Select a requirement.
In the requirements tree, select the Cruise Reservation requirement.
3 Open the Convert to Tests wizard.
Choose Tools > Convert to Test > Convert Selected. The Step 1 dialog box opens. 
Manual Testing 10
 
4 Choose an automatic conversion method.
Select Convert all requirements to subjects to convert all selected requirements to subjects.
5 Start the conversion process.
Click Next to begin converting the requirements. When the conversion process is complete, the results are displayed in the Step 2 dialog box.
Manual Testing 11
 
Select Cruise Booking, and click the Test button.
Click Next. The Step 3 dialog box opens.
Manual Testing 12
7 Choose the destination subject path.
In the Destination Subject Path, click the browse button. The Select Destination Subject dialog box opens.
Select Cruises from your test plan tree.

Manual Testing 13

 
Click OK to close the Select Destination Subject dialog box. The Destination Subject Path box now indicates the following path:
Manual Testing 14
 
8 Finalize the conversion process.
Click Finish.
Click OK in the Information dialog box to close the Convert to Tests wizard.
9 View the converted requirements in the test plan tree.
Click the Test Plan tab to display the Test Plan module.
In the test plan tree, select Cruises and click the Refresh Selected button. The test plan tree displays Cruise Reservation under Cruises.
Expand Cruise Reservation. The test plan tree displays Cruise Booking and Cruise Search as manual tests.
Manual Testing 15

Other Projects to Try:

  1. White Box Testing , Cyclomatic Complexity, Data Flow Testing, Control Flow Testing
  2. Black Box Testing , Automated Testing Tool
  3. Online Reservation System Project in Java
  4. Website Testing Tools
  5. Basics of Hacking and Penetration Testing

Filed Under: Software Testing

Primary Sidebar

Tags

.Net Projects Download Android Project Ideas Android Projects Angular 2 Assembly Codes C # Projects C & C++ Projects C++ Projects Class Diagrams Computer Graphics Database Project Data Mining Projects DataScience Projects Datastructure Assignments Download Visual Basic Projects Electronics project Hadoop Projects Installation Guides Internet of Things Project IOS Projects Java Java Interview Questions Java Projects JavaScript JavaScript Projects java tutorial JSON JSP Projects Mechanical Projects Mongodb Networking Projects Node JS Projects OS Problems php Projects Placement Papers Project Ideas Python Projects seminar and presentation Struts

Search this Website


Footer

Download Java Project
Download Visual Basic Projects
Download .Net Projects
Download VB Projects
Download C++ Projects
Download NodeJs Projects
Download School Projects
Ask Questions - Forum
Latest Projects Ideas
Assembly Codes
Datastructure Assignments
Computer Graphics Lab
Operating system Lab
australia-and-India-flag
  • Home
  • About me
  • Contact Form
  • Submit Your Work
  • Site Map
  • Privacy Policy